 This is a truly cherished family favorite of mine! Don't be scared to throw extra cheese and toppings in there- the more the merrier! (I'm guilty of going overboard on the cheese most times!)
5 or 6 medium sized potatoes, scrubbed water 1 cup Whole Milk 3 Tbsp all-purpose flour 1 cup (8 ounces) sour cream 1 teaspoon salt 1/2 teaspoon pepper 2 green onions, trimmed and sliced thin (use green and white), reserve 1 tablespoon for sprinkling 1 heaping cup shredded cheddar cheese (or double it if you're a cheeseaholic like me!) Healthy handful of bacon bits! Slice potatoes into 1/4" wide slices and then boil for about 25 minutes, or until tender when poked with a fork. Drain and set aside for now. Preheat oven to 375F and grease a large baking dish. (I use a standard 13x9) Whisk together the milk and flour in a large bowl until well combined. Add the sour cream, salt, pepper, and whisk to combine until smooth. Stir in the green onions; set aside. Add potatoes to the milk-sour cream mixture, and gently stir and toss to coat. Allow potatoes to sit and soak up some of the cream mixture for about 5 minutes. Transfer the potatoes and any leftover cream mixture to prepared baking dish, making sure the potatoes lay mostly flat because edges or corners that are jutting up will be prone to burning. Evenly top with cheese and bacon bits and bake for about 30 minutes, or until cheese is melted and lightly golden browned. Garnish with reserved green onions before serving.
7 Comments
 These potatoes are super delicious and a snap to make when you're pressed for time!
4 medium potatoes, scrubbed (not peeled) 4 tablespoons olive oil ¼ teaspoon garlic powder, onion powder & pepper ½ teaspoon parsley salt to taste 4 tablespoons fresh parmesan cheese, divided Preheat oven to 450 degrees and line a pan with parchment paper. Slice potatoes ¼" thick and toss with olive oil seasoning and 2 tablespoons of parmesan cheese. Bake in a single layer about 30 minutes or until browned, flipping potatoes after 15 minutes. Once browned, top with remaining 2 tablespoons parmesan cheese and bake an additional 5 minutes or until cheese bubbles and browns. 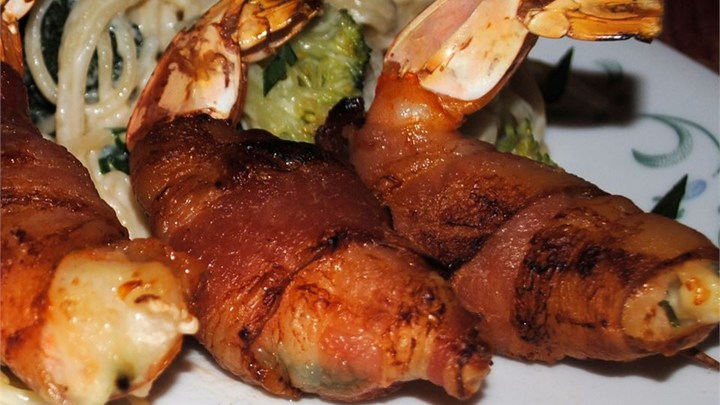 This is a favorite of mine to make whenever we BBQ on the weekends! Goes awesome with steaks.
2 fresh jalapeno peppers 8 medium sized shrimp, peeled, deveined and cooked 8 strips of bacon sour cream Cut tops off of jalapeno peppers and remove seeds. Slice each jalapeno into 4 long strips. You can do them smaller if you don't like it so hot. Cut a slit into the back of each shrimp where it was deveined. Place a slice of jalapeno in each slit and then cover with cream cheese. Not too much, or it melts out! I like to microwave the bacon for a minute so that its halfway cooked. Wrap bacon around each shrimp, securing in place with a toothpick. Grill until bacon is nice and crispy. Watch for flare-ups on the grill or else you'll burn some bacon! 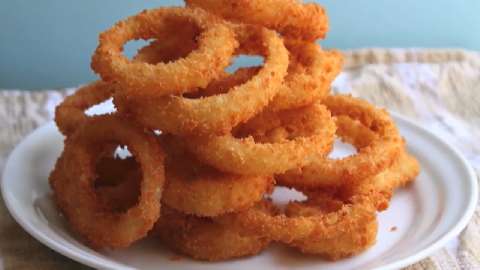 These are so easy to make and so yummy, you better make extra because everybody loves these!
2 cups flour 1/2 cup Panko bread crumbs 1-1/2 tsp salt 1 tsp black pepper 1/2 tsp baking powder 1 cup buttermilk ( or milk+1 tsp vinegar, stir and let sit for 5 minutes) 1 large sweet onion, cur into 1/2" slices Vegetable oil for frying Preheat oil in deep fryer or large deep pan. Place buttermilk in a bowl and set aside for now. In separate bowl, mix together flour, panko, salt, pepper and baking powder. Dip onion rings in flour, then buttermilk, then flour again. Place in the hot oil without crowding them too much. When they're golden brown, remove and drain well! 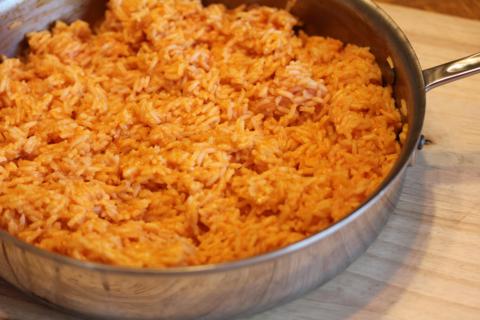 I've had a very hard time getting my mexican rice to come out right. It's usually too mushy or sticky, too much tomato sauce, or just not right somehow. For years, I'd envy restaurants their light, fluffy flavorful rice and curse myself for not being able to pull it off myself. My poor husband had to put up with years of funky rice from me. Finally, after many years, I found a recipe that started me on the road to the right rice! The first time, it was...better....but still needed a flavor fix. After tweaking it a dozen times, I finally got the flavor right!!
1/3 cup oil 1 cup rice 1/4 diced onion 1 1/2 c chicken broth (I microwave water with one chicken bullion cube) 6 oz tomato sauce 1 tsp black pepper 1 tsp chili powder 1 tsp garlic powder 1/2 tsp cumin (optional) 1 small can of chopped green chiles Heat oil on medium heat in a medium saucepan, add onion and cook until it starts to sweat. Add rice (and green chiles) and cook until starting to turn golden brown. Add chicken broth, tomato sauce and seasonings. Heat to boiling, cover tightly, reduce heat to low and cook for 20 min. I usually stir it ONCE halfway through cooking just to make sure everythings mixed properly. When done, fluff with a fork , serve and enjoy!! Stores great in fridge, and in my opinion, tastes even better after setting overnight! 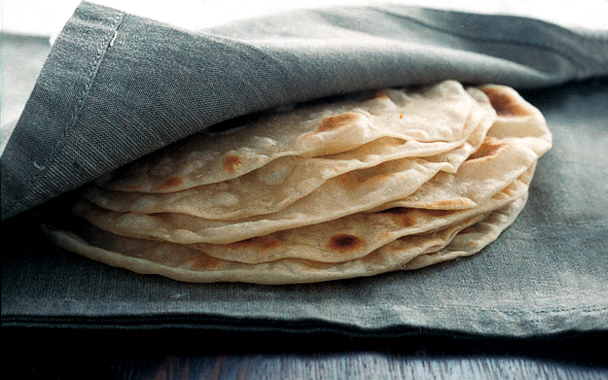 Along with trying to perfect my mexican rice, I've also had a lot of trouble over the years making perfect tortillas from scratch. Usually they'll come out tasting great, but once they cool, they get hard and break. Nothing is more frustrating than being in the middle of a wonderful fajita taco and the tortilla rips in half and your taco basically explodes! Finally, after years of trial and error, I have perfected my tortillas! They stay soft, they heat up easily, storable and delicious!!
3 cups flour 1 Tablespoon salt 1 teaspoon baking powder 1/3 vegetable or canola oil 1 cup warm water Combine all the dry stuff and mix well. Add the oil and hot water. Mix well. Roll into balls about the size of golf balls and then flatten with your hand. Cover with a damp towel and let rest for 15 minutes. Heat a comal or flat pan up during the last 5 min to be ready to cook on. After 15 minutes, roll each flattened dough ball out on a lightly floured surface until about as thin as a regular tortilla. Place a tortilla on the comal or flat pan, flipping once whenever you start to see a few bubbles appear. Watch the comal carefully, it's very easy to burn them in just a few seconds. you only need to flip the tortillas ONCE! If you flip more, they'll start to get tough. I like to keep my tortillas warm in the middle of a folded towel until ready to serve since it prevents them from getting soggy. To store, I just throw them in a large ziplock, and they'll stay soft for a few days! |

About MeI'm a Texas gal with a wonderful husband, an amazing six year old son, and an adorable newborn baby boy! Archives
June 2016
Categories
All
Follow Me! |


